Duolink® PLA Fluorescence Protocol
This protocol describes the use of Duolink® PLA reagents for the immunofluorescent detection, visualization, and quantification of individual proteins, protein modifications, and protein interactions in tissue and cell samples. To become familiar with the Duolink® PLA technology, download our brochure and review How to Optimize the Duolink® Proximity Ligation Assay for more details. For other protocols, please see the Duolink® PLA Brightfield Protocol and the Duolink® PLA Probemaker User Guide.
Materials and Equipment
Duolink® PLA Fluorescence Protocol
Results
Troubleshooting
References
Materials and Equipment
Duolink® PLA Reagents
Please refer to the Duolink® PLA Product Selection Guide for specific product recommendations. Briefly, to run a Duolink® PLA experiment for Fluorescent detection, the following Duolink® PLA products are needed:
- Duolink® PLA Probes (one PLUS and one MINUS from different species, matching the host species of your primary antibodies). Each kit includes:
- PLA Probes (5x) – PLUS and/or MINUS, depending on the product
- Blocking Solution – For blocking the sample prior to antibody incubations
- Antibody Diluent – For dilution of PLA probes, and if needed, primary antibodies
Note: Duolink® PLA Probemaker PLUS and/or Probemaker MINUS kits may be used to generate custom PLA probes if needed. Please see the Probemaker Guide for details.
- Duolink® Fluorescent Detection Reagent (choose from green, orange, red, and far red). Each kit includes:
- Ligation Stock (5x) – Diluted to make 1x Ligation Buffer
- Ligase (1 U/μL) – Added to make the Ligation Solution
- Amplification Stock (5x) – Diluted to make 1x Amplification Buffer
- Polymerase (10 U/μL) - Added to make the Amplification Solution
- Wash Buffers for Fluorescence (A and B)
- Duolink® Mounting Media with DAPI (for use on slides, store at 2-8 °C) OR Nuclear Stain and Anti-fade (for use in microplates, store at -20 °C)
Additional Materials
- Primary antibodies of choice to detect the protein(s) of interest. Must have been raised in mouse, rabbit or goat when using in conjunction with Duolink® PLA Probes.
- High purity water (sterile filtered, Milli-Q® or similar)
- Sample (cells or tissue) on a slide, pre-treated with respect to fixation, retrieval, and permeabilization. Please refer to How to Optimize the Duolink® Proximity Ligation Assay for suggestions and recommendations, and for details on the following topics:
- Experimental design and controls
- Choice of primary antibodies and optimization
- Sample processing
Equipment
- Fluorescence microscope with appropriate filters, camera, and software for image acquisition
- 37 °C incubator
- Orbital shaker
- Heated humidity chamber or Microplate Heat Transfer Block
- Hydrophobic pen for delimiting the reaction area
- Freezer block (for enzymes)
- Staining jars
- Forceps
- Pipettes and tips (from 1 μL to 1000 μL)
- Coverslips compatible with fluorescence microscopy
Duolink® PLA Fluorescence Protocol
The following protocol is for a 1cm2 sample on a slide, requiring 40 µL of solution for adequate coverage. Adjust the volume according to your reaction area and number of samples. All incubations should be performed in a humidity chamber. All wash steps should be performed at room temperature in a staining jar with at least 70 ml buffer with gentle agitation.
Reagent Preparation
- Wash Buffers A and B should be made prior to beginning the assay by dissolving the contents of one pouch in high purity water to a final volume of 1000 mL. Solutions may be stored at room temperature for short term storage (less than two weeks) or at 4°C for long term storage. NOTE: Bring the solutions to room temperature before use.
- 0.01x Wash Buffer B should be made prior to beginning the assay by diluting 1x Wash Buffer B 1:100 in high purity water.
- Many Duolink® PLA reagents are supplied as concentrated stocks and are to be diluted immediately prior to use. Do not store diluted Duolink® PLA reagents.
Duolink® PLA Protocol
Before starting, the samples should be deposited on glass slides and pre-treated with respect to fixation, retrieval, and/or permeabilization. Review How to Optimize the Duolink® Proximity Ligation Assay for details.
- Blocking
- Vortex the Duolink® Blocking Solution.
- Add 1 drop (~40 µL) of Duolink® Blocking Solution to each 1cm2 sample. Be sure to cover the entire sample with Blocking Solution.
- Incubate the slides in a heated humidity chamber for 60 minutes at 37 °C.
- Primary Antibody Incubation NOTE: Do not allow the slide to dry before adding antibody as this can cause background.
- Vortex the Duolink® Antibody Diluent.
- Dilute your primary antibody or antibodies to suitable concentration in the Duolink® Antibody Diluent.
- Tap off the Duolink® Blocking Solution from the slides
- Add the primary antibody solution to each sample.
- Incubate the slides in a humidity chamber. Use the optimal incubation temperature and time for your primary antibodies.
- Duolink® PLA Probe Incubation
- Vortex PLUS and MINUS PLA probes
- Dilute the PLUS and MINUS PLA probes 1:5 in the Duolink® Antibody Diluent.
For a 40 µL reaction, take 8 µL of PLA probe MINUS stock, 8 µL of PLA probe PLUS stock and 24 µL of Antibody Diluent. Make sufficient solution for all samples. - Tap off the primary antibody solution from the slides
- Wash the slides 2x 5 minutes in 1x Wash Buffer A at room temperature.
- Tap off excess wash buffer and apply the PLA probe solution.
- Incubate the slides in a pre-heated humidity chamber for 1 hour at 37 °C.
- Ligation
NOTE: Wait to add the ligase until immediately prior to addition to the sample. Make sure ligation buffer is completely thawed and mixed well prior to usage.- Dilute the 5x Duolink® Ligation buffer 1:5 in high purity water and mix.
For a 40 µL reaction, add 8 µL of the 5x Ligation buffer to 32 µL of high purity water. Make sufficient solution for all samples. - Tap off the PLA probe solution from the slides.
- Wash the slides 2x 5 minutes in 1x Wash Buffer A at room temperature.
- During the wash, retrieve the Ligase from the freezer using a freezer block (-20 °C).
- Add Ligase to the 1x Ligation buffer from step (a) at a 1:40 dilution and mix.
For 40 µL ligation solution, add 1 µL of Ligase to 39 µL of the 1x ligation buffer. - Tap off excess wash buffer and apply the ligation solution.
- Incubate the slides in a pre-heated humidity chamber for 30 minutes at 37 °C.
- Dilute the 5x Duolink® Ligation buffer 1:5 in high purity water and mix.
- Amplification
NOTE: Wait to add the polymerase until immediately prior to addition to the sample. The Amplification buffer is light-sensitive. Protect all solutions containing buffer from light.- Dilute the 5x Amplification buffer 1:5 in high purity water and mix. For 40 µL reaction, add 8 µL of the 5x Amplification buffer to 32 µL of high purity water. Make sufficient solution for all samples.
- Tap off the ligation solution from the slides.
- Wash the slides 2x 5 minutes in 1x Wash Buffer A at room temperature
- During the wash, retrieve the Polymerase from the freezer using a freezer block (-20 °C).
- Add Polymerase to the 1x Amplification buffer from step (a) at a 1:80 dilution and mix.
- Tap off excess wash buffer and apply the amplification solution.
- Incubate the slides in a pre-heated humidity chamber for 100 minutes at 37 °C.
- Final Washes
NOTE: Light-sensitive reagents. Keep the slides protected from light at all times.- Tap off the amplification solution from the slides.
- Wash the slides 2x 10 minutes in 1x Wash Buffer B at room temperature.
- Wash the slides in 0.01x Wash Buffer B for 1 minute.
- Preparation for Imaging
NOTE: Duolink® In Situ Mounting Media with DAPI is aqueous and does not solidify. Clear nail polish can be used to seal the edges of the coverslip to the slide. Avoid getting air bubbles caught under the coverslip.- Tap off excess wash buffer from the slides.
- Mount the slides with a coverslip using a minimal volume of Duolink® In Situ Mounting Medium with DAPI.
- Wait for 15 minutes before analyzing in a fluorescence or confocal microscope, using at least a 20x objective.
- After imaging, store the slides in the dark at 4 °C for up to 4 days or at -20 °C for up to 6 months
Results
Image Acquisition
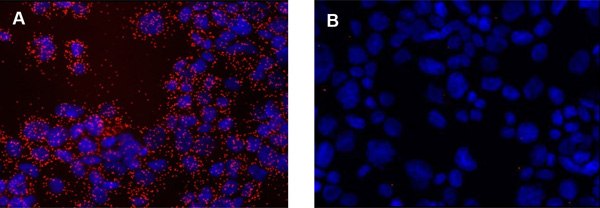
The result from a Duolink® PLA experiment is typically viewed using a fluorescence microscope with the appropriate filters for the detection fluorophore used. The Duolink® PLA signal is recognized as discrete fluorescent spots in various locations of the studied cells (Figure 1A). Individual signals are of sub-micrometer size and may be in multiple focal planes. Thus, it may be necessary to obtain images throughout the entire thickness of the sample. However, images may be acquired in just one plane, as long as all images to be compared are acquired in a similar position within the sample. Of note, a few signals are often detected in technical negative controls (e.g., without primary antibodies, Figure 1B). However, if more than one or two signals per ten cells are obtained, further titration of primary antibody may be needed

Figure 1.Detection of EGFR in cytospin preparations of A431 cells using Duolink® PLA. The pictures show a maximum intensity projection of the raw image based on 20 z-planes. PLA signals are shown in red and the nuclei in blue. The nucleus image was acquired in one z-plane. A) Positive reaction. B) Negative control without primary antibodies.
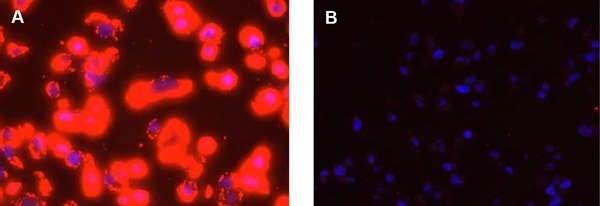
It is important that the same settings (exposure time, gain, filters used, etc.) are used to capture all images within an experiment. Settings can be optimized using positive and negative controls. If the number of PLA signals is large, the PLA signals can merge/coalesce (Figure 2). This can occur when studying highly expressed proteins or during image capture due to overexposure. Care must then be taken to set the acquisition settings to obtain individual PLA signals. Please refer to the Duolink® PLA Troubleshooting Guide for tips on how to prevent signal coalescence and other potential areas for optimization.

Figure 2.Detection of Her2 in FFPE preparations of SKBR-3 high expression cells using Duolink® PLA. The pictures show a maximum intensity projection of the raw image based on 20 z-planes. PLA signals are shown in red and the nuclei in blue. The nucleus image was acquired in one z-plane. A) Positive reaction. B) Negative control without primary antibodies.
Image Analysis
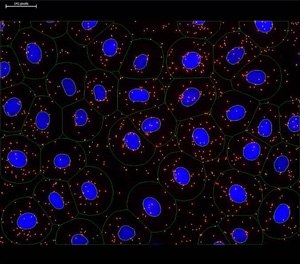
There are several image analysis tools available that can be used to quantify PLA signals. The image data can be analyzed for the mean fluorescence intensity of the PLA signals and/or the total number of PLA signals per cell or per area within the cell (Figure 3). Quantification is then reported as relative to technical and/or biological controls within a given experiment. However, reliable quantification is only possible if the PLA signals have not coalesced and the image pixels have not become saturated.

Figure 3.Image analysis using imaging software. The DAPI-stained nuclei (blue) were automatically detected and the cytoplasm size was estimated by the user (green outlines). PLA signals are shown in red representing the protein target of interest. The PLA signals marked with white circles and the nuclei outlined in yellow were quantified during analysis.
Troubleshooting
Please refer to the Duolink® PLA Troubleshooting Guide for Tips and Tricks, general troubleshooting guidelines, and a set of frequently asked questions (FAQs).
Always feel free to contact our technical support team for assistance with your experiments or your local sales representative.
Custom Services
Does your experiment require additional customization? Let us do the work for you. Learn more about our Custom Services program to accelerate your Duolink® PLA projects.
Materials
References
To continue reading please sign in or create an account.
Don't Have An Account?