How to Optimize the Duolink® Proximity Ligation Assay
To successfully execute a Duolink® PLA experiment, there are some necessary considerations to properly prepare for, setup, and execute the assay protocol. Duolink® PLA products are available for fluorescence and brightfield microscopy. Fluorescence Duolink® PLA reagents can be used in both microscopy and flow cytometry application formats.
Experimental Design
There are many factors that must to be taken into account when designing a successful Duolink® PLA experiment. These include but are not limited to:
- Determining the protein target and assay type
- Selection of sample (cells or tissue)
- Devising your read-out scheme
- Designing experimental controls (technical and biological)
Target Identification
The first thing to determine is the protein target of interest. Is it the expression of a single protein, a protein-protein interaction (PPI), or a protein post-translational modification (PTM)? A brief description of how Duolink® PLA can be used to detect various types of protein targets is shown below.
Detection of Single Protein Expression
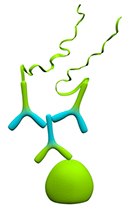
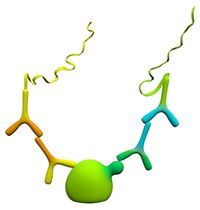
There are two ways to detect a single protein target: with the use of one primary antibody (single recognition) or two primary antibodies (double recognition) against the target.

Figure 1.Single Recognition
Single recognition confers the highest sensitivity and is recommended when detecting single protein targets that are present at low expression levels. This method is also useful when determining individual primary antibody concentrations prior to experiments that use two antibodies. However, this method is only recommended when a well-performing, specific primary antibody is available. Use of a non-specific primary antibody will result in high background due to the sensitivity of the assay.

Figure 2.Double Recognition
Double recognition provides greater specificity through the use of two primary antibodies. Each primary antibody must be directed against different, non-competing epitopes on the same target molecule. Furthermore, the two primary antibodies must be raised in different species (mouse, rabbit, or goat) and must bind to the target under the same experimental conditions. These conditions are delineated in the Assay Preparation section below.
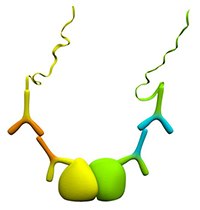
Detection of Protein-Protein Interactions
Duolink® PLA provides an excellent way to detect protein interactions. This is done using two primary antibodies, each directed against one of the targets of interest, and each raised in different species (mouse, rabbit, or goat). The two primary antibodies must bind to the target under the same experimental conditions.

Figure 3.Protein-Protein Interactions
Detection of Protein-Nucleic Acid Interactions
Protein-DNA and protein-RNA interactions can also be detected using a combination of modified in situ hybridization techniques and Duolink® PLA. For more information about the detection of protein-DNA or protein-RNA interactions using Duolink® PLA, see references.
Sample Selection
Previous knowledge of the sample and the protein target is important. Choosing a system with known target protein expression will dramatically increase chances of a successful Duolink® PLA experiment.
The samples needed for Duolink® PLA experiments are the same as those used for traditional immunofluorescence (IF), immunohistochemistry (IHC), or flow cytometry. Thus, Duolink® PLA reagents can be used with a broad range of sample types, including:
- Adherent cells
- Suspension cells
- Blood cells
- Cytospin preparations
- Paraffin-embedded cell samples
- Paraffin-embedded tissue sections
- Frozen tissue sections
- Fresh tissue sections
All samples must be fixed prior to performing a Duolink® PLA experiment. For Flow Cytometry applications, it is necessary to use suspended cells.
Choosing a Readout Method
Duolink® PLA products are available for fluorescence and brightfield. Fluorescence Duolink® PLA reagents can be used in both microscopy and flow cytometry application formats.
The key consideration for choosing a readout method is availability of specialized equipment. Fluorescent microscopy is the most popular readout for Duolink® PLA experiments. All sample types mentioned above can be used with Fluorescence Duolink® PLA reagents, however, some samples exhibit significant autofluorescence. If this occurs or when fluorescence instrumentation is unavailable, Brightfield Duolink® PLA is available for use with a light microscope.
The flow cytometry protocol is agnostic for instrument type (assuming the appropriate filters for the designed experiment are available) and can be easily adapted for attached or suspension cells.
Experimental Controls
Duolink® PLA results provide relative quantification of a protein event (expression, interaction or modification). Thus, it is important to include technical and, when possible, biological controls.
Technical Controls
There are two technical controls that should be included in every Duolink® PLA experiment. These include:
- Omission of each primary antibody separately
- Used to detect non-specific binding of each primary antibody
- Helpful in determining optimal primary antibody titer
- Omission of all primary antibodies
- Used to detect non-specific binding of the Duolink® PLA probes in the system.
Biological Controls
In addition to technical controls, the use of biological controls is highly recommended. Both positive and negative biological controls can provide valued information.
- Positive controls
- Include a separate sample with known protein expression, interaction or modification to test reagents
- Use of an inducible system (e.g., growth factor stimulation, heat shock, etc.) will provide biological relevance of Duolink® PLA signal
- Negative controls
- Use of sample not expressing the protein target(s) (e.g., knockout, silencing, etc.) will provide information on the specificity of the primary antibodies
- Use of an irrelevant antibody (e.g., isotype IgG, antibody to a non-interacting protein, etc.) will provide information on the specificity of the Duolink® PLA probes
- Use of inhibitors which prevent protein interaction or modification will provide biological relevance of Duolink® PLA signal
Assay Preparation
To ensure successful execution of a Duolink® PLA experiment, considerable preparatory work is required. This prep work is similar to that needed for traditional IF, IHC or flow cytometry. This section delineates considerations for primary antibody identification, sample preparation, and antibody optimization.
Choice of Primary Antibodies
The Duolink® PLA reagents are universal reagents using secondary antibodies for detecting presence of target-specific primary antibodies. The choice of primary antibodies is crucial when setting up Duolink® PLA experiments.
Requirements
The Duolink® PLA probes are donkey anti-mouse, anti-rabbit, or anti-goat secondary antibodies; therefore, there are certain requirements of the primary antibodies. These include:
- Host must be mouse, rabbit, or goat (exceptions require use of Duolink® Probemaker)
- IgG class
- Can be monoclonal or polyclonal
- Affinity purified preferred to minimize cross-reactivity
- Validated by IF or IHC is recommended
Use of Directly-conjugated Primary Antibodies
There are situations when the use of directly-conjugated primary antibodies is needed. The Duolink® Probemaker enables the conjugation of a PLA oligo (PLUS or MINUS) to any antibody. Considerations for using the Duolink® Probemaker are:
- When the host of a primary antibody is different than mouse, rabbit, or goat
- When using two primary antibodies from the same species
- When using a primary antibody which was raised in the same host as the tissue sample (e.g., “mouse on mouse”)
Primary Antibody Optimization
For successful execution of a Duolink® PLA experiment, it is important to identify the conditions for optimal primary antibody performance within the sample to be tested. Conditions for primary antibody optimization should include:
- Sample processing (fixation, permeabilization, and antigen retrieval)
- Primary antibody concentration
- Blocking solution and antibody diluent
Specific considerations for sample processing, blocking, and antibody diluent are described below. It is highly recommended that conditions for the primary antibodies be first identified by IF or IHC staining. When using two primary antibodies, optimization for each primary antibody should be done separately, however sample processing needs to be compatible for optimal performance of both primary antibodies.
Once conditions are determined by IF or IHC, these conditions can then be applied to Duolink® PLA. However, primary antibody concentrations may need to be further titrated for the Duolink® PLA experiment as Duolink® PLA provides greater sensitivity and amplified signal compared to IF and IHC. Using the Duolink® PLA single recognition approach described above offers the greatest sensitivity when optimizing primary antibody concentrations. These conditions can then be used in Duolink® PLA experiments using both primary antibodies.
Sample Processing
Samples should be appropriately processed with respect to fixation, permeabilization, and epitope retrieval. It is crucial for the performance of the assay to optimize the conditions for the primary antibodies that are to be used in the experiment.
Fixation
Fixation is used to immobilize antigens while retaining cellular and subcellular structure. The choice of fixative may vary depending on sample type (cells or tissue), the primary antibodies and the protein target. Different fixatives can influence the antigenicity, and thus the performance, of primary antibodies. If there is no recommended fixation for the selected primary antibodies, this must be optimized by the user.
Duolink® PLA reagents are compatible with all fixations typically used for IF and IHC, including:
- Acetone
- Ethanol
- Formalin
- Methanol
- Paraformaldehyde
- Zinc
Permeabilization
Permeabilization is required for antibody access to intracellular epitopes. Often this is achieved through the use of detergents, such as Triton X-100, NP-40, Tween-20, or digitonin. There are a number of detergents available - use one that is best for the fixation and sample being used. Of note, some fixatives (e.g., acetone and methanol) also cause permeabilization so an additional step to permeabilize may not be necessary.
Epitope Retrieval
Epitope retrieval is used to reveal epitopes that have become masked during fixation, allowing antibodies to bind. Most commonly, epitope retrieval is used for formalin-fixed, paraffin-embedded (FFPE) samples, but is also sometimes used with cells fixed in suspension. Different methods for epitope retrieval can impact the performance of primary antibodies, and thus must be optimized by the user.
There are two predominant methods, heat-induced epitope retrieval (HIER) and proteolytic-induced epitope retrieval (PIER). Duolink® PLA is compatible with common epitope retrieval buffers used for IHC, including:
- HIER: Trilogy™, citrate, EDTA, and high pH Tris
- PIER: Treatment with proteinase K, pepsin, and trypsin
Blocking Solution and Antibody Diluent
Duolink® Blocking Solution and Antibody Diluent are provided with the Duolink® PLA probes (PLUS and MINUS). These solutions have been optimized for use with Duolink® PLA reagents to minimize nonspecific binding of the antibodies and detection oligos. However, it is important to verify that your primary antibodies bind specifically to the protein targets of interest under these conditions. Each primary antibody should be tested separately using the Duolink® PLA single recognition assay, or possibly IF or IHC.
If you have previously identified a blocking solution and/or antibody diluent for use in IF or IHC staining, it is likely that these can also be used in Duolink® PLA. Isotype IgG from the same species as your primary antibodies should not be used as the blocking reagent in these solutions, as this will cause false signals from the Duolink® PLA probes.
Appendix
Reaction Volume
For best result the reaction volume should be adjusted to the reaction area. For an area of 1 cm2 a reaction volume of 40 μL is suitable. Adjust the volume according to your reaction area. Never use less than 15 μL of total reaction volume.
A Guide for Smaller Areas
0.2 cm2 – 15 μL total reaction volume
1 cm2 – 40 μL total reaction volume
2 cm2 – 80 μL total reaction volume
3 cm2 – 120 μL total reaction volume

Figure 4.
A Guide for Larger Areas
1 cm2 – 40 μL total reaction volume
4 cm2 – 160 μL total reaction volume
6 cm2 – 240 μL total reaction volume
8 cm2 – 320 μL total reaction volume
10 cm2 – 400 μL total reaction volume

Figure 5.
Materials
To continue reading please sign in or create an account.
Don't Have An Account?