Tips and Tricks: Millicell® DCI Digital Cell Imager Cloud Application
How to calculate cell doubling time
- Under “Trends” in the Millicell® DCI Cloud App, choose the cell line, project and/or passage.
You will see a graph (Figure 1). - Zoom into the graph.
- Place the arrow cursor on any point on the graph (Figure 1A) and zoom in or out using the scroll wheel of your mouse. You will see both the x- and y-axis intervals change (Figure 1B and 1C). Place the arrow on the graph and hold the left mouse button down to move the graph so that you can see the graph in your viewpoint.
- From the graph, estimate when the growth curve line passes 30% confluency (y-axis, Figure 1B) and 60% confluency (y-axis, Figure 1C). Calculate the number of hours it takes to move from 30% to 60% confluency (x-axis) to estimate the doubling time.
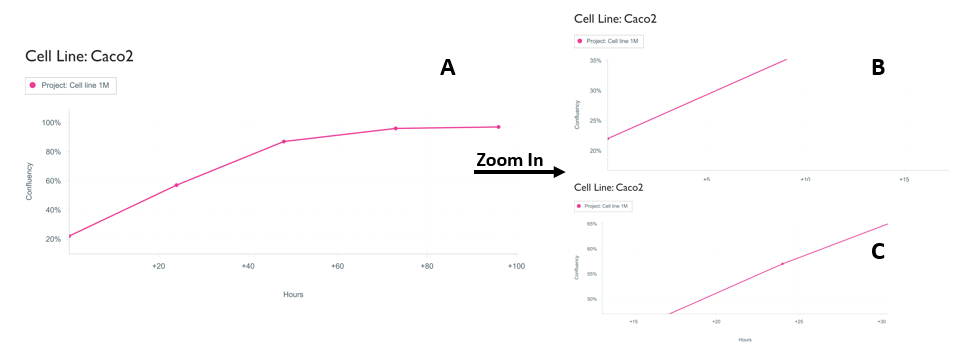
Figure 1.Growth curve graph of a Caco-2 cell culture (A). Zooming into the graph allows one to see the axis more clearly (B and C) and calculate the time it takes for the cell confluency to double (for example, from 30% to 60%).
How to find specific images
- Use the Filters option. This allows you to filter images based on several criteria.
- Under “Measurements” in the Millicell® DCI Cloud app, choose “Custom” then “Select Filters”. Filters are shown in the images below (see Figure 2A and 2B). Select a particular “Cell Line”, “Project”, “Created By” or “Type” of dish.
- In the example shown in Figure 2, selection of filters helped in narrowing the number of images from 1231 (Figure 2C) to four images (Figure 2D).
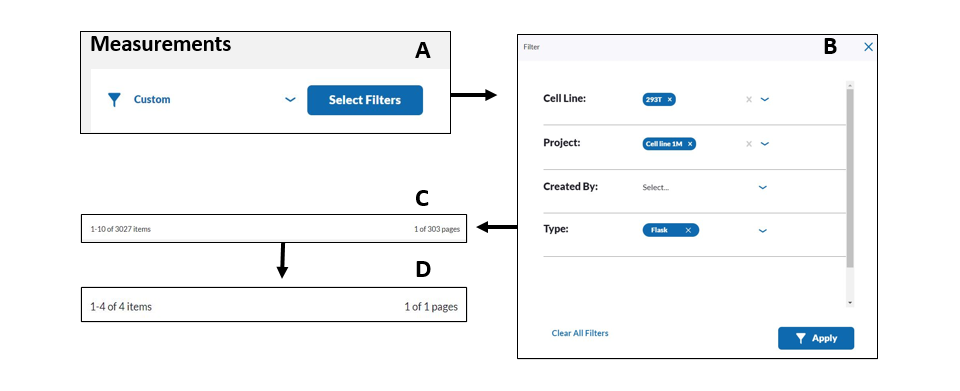
Figure 2.Steps to narrow the selection of images in a profile.
- If you need a snapshot of all your data from a single project (e.g., to look at hemocytometer count and the confluency data), under the “Actions” section, click on “Download data as CSV” (Figure 3).
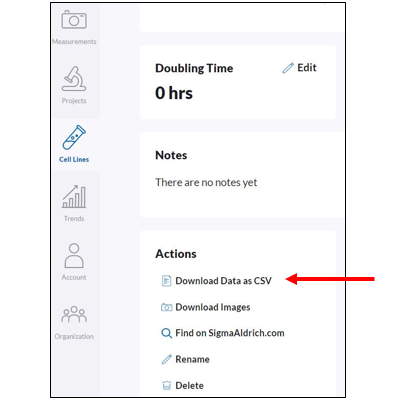
Figure 3.Downloading data from a project.
Deleting a cell line vs. deleting a project
- Deleting a cell line: Only an “Owner” can delete the cell line. The images are then permanently deleted, per the dialog box that pops up. You need to type in the cell line to confirm delete. Reason: Once a cell line is created, it may be used by multiple people in the group.
Under “Cell Line” in the Millicell® DCI Cloud, choose the cell line you wish to delete - scroll down to “Actions”, then click “Delete”. The following dialog box pops up (Figure 4). Follow instructions and click “Delete”.
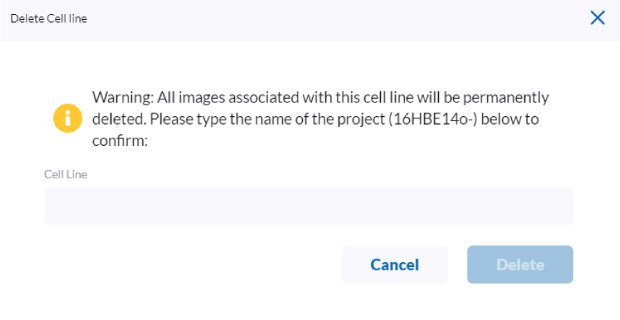
Figure 4.Delete Cell Line screen.
- Deleting a Project: If a user wants to delete their data for a specific cell line, it is better to delete the project so that only a single user’s data is deleted.
Under “Projects” in the Millicell® DCI Cloud, choose the project you wish to delete - scroll down to “Actions” and then click “Delete”. The following dialog box pops up (Figure 5). Follow instructions and click “Delete”.

Figure 5.Delete Project screen.
Adjusting masking for specific cell lines
When masking doesn’t recognize all the cells for certain cell types, it can lead to a lower confluency reading. To correct this:
- Adjust the brightness level.
- When it is underestimating the number of cells at very high confluency levels (95-100%), adjust the “Mask Adjacent” setting to a higher level to increase the ability to mask the cells.
Should I add in the passage number of the cells?
Yes, this helps to look at growth curves under different passages.
Tricks for hemocytometer-based counting
If you adjust the focus and make the cells appear as dots (i.e., dark circles), the Millicell® DCI will count more of the cells in the quadrant (see Figure 6C vs. 6A). In Figure 6A, the cells are seen as bright circles. The Millicell® DCI counted 16 cells in the grid (Figure 6B). By adjusting the focus and making the cells appear as dark circles (Figure 6C), the Millicell® DCI counts 44 cells within the same grid (Figure 6D).
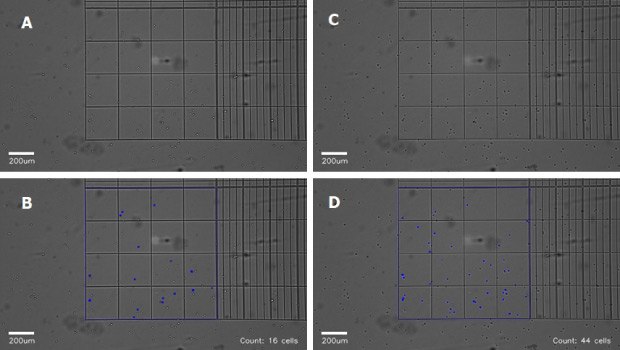
Figure 6.Optimizing hemocytometer count by adjusting focus.
Keeping track of multiple Quick Capture images taken within each project
You can use the “Notes” section to record specific information such as % confluency, passage number, etc. This allows you to save images in the specific project folder you need that is easily accessed.
Cell counting tricks
If you want to get a snapshot of estimated cell count results across multiple days, under the “Trends” section you can change the statistic to “Estimated count” instead of “Confluency”. Please note that this will give you an estimated cell count.
Materials
To continue reading please sign in or create an account.
Don't Have An Account?